Thread Roll Forming Fasteners For Standard Panel And Component Thicknesses

Unique Thread Configuration Gradually Roll Forms Mating Threads
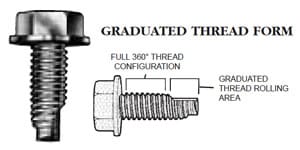
The TAP/R screw has a unique thread configuration that begins as a tapered, intermittent thread and increases to a full 360° thread form. Unthreaded relief areas reduce the initial frictional contact.
Tap/R Screw Point
The unthreaded relief areas on the TAP/R screw provide a positive lead into the pilot hole. Initially, the intermittent thread portion of the screw engages only at the apex of the out-of-round point. Gradually, the screw shank, and the mating thread that is being roll formed, attain a fully threaded, 360° fully rounded configuration.
In addition to providing for progressive roll forming, the tapered TAP/R screw point finds the hole. As the unique thread form also “finds” a previously formed thread, the screw can be re-used in the same hole, time after time, without cross threading.
Increased Safe Operating Range
The difference between the maximum driving torque and the minimum torque at which the screw will strip is the safe operating range. The gradual thread rolling action of the TAP/R screw requires less driving torque than other thread forming screws. Greater tightening torque can, however, be applied to the fully engaged TAP/R screw without the risk of stripping.
Increased Torque Retention
The ability of a fastener to retain its initially applied tightening torque is an excellent indication of true holding power. In a series of comparative tests, the TAP/R screw, with its full 360° thread engagement, retained 92% of initial tightening torque after 24 hours. Comparably sized tri-lobular type screws, tightened to the same torque, on the average, retained only 80%.
The Chip Free Fastener With Superior Performance
/Reduces Driving Torque And Increases Stripping Torque.
/Round Shank Assures Full 360° Thread Engagement For Maximum Holding Power.
/Retains More Applied Torque And Clamp Load Than Tri-Lobular Type Screws.
/Retains Same Hole Sizes As Tri-Lobular Type Screws. No Need To Change Specifications Or Tooling.
/Rapidly Locates Hole. Unthreaded Relief Area On Point Quickly Positions Screw In Pilot Hole.
/Reusable In Same Hole Without Cross Threading. With Its Unique Tapered, Intermittent Thread Form, The Tap/R Screw Can Be Removed And Reused In The Same Hole, Time After Time Without Damaging The Mating Thread.
/Removes Paint And Porcelain From Hole. The Relief Areas On The Two Sides Of The Shank Function As A Paint Scraper To Remove Paint Or Porcelain From The Pilot Hole.
/Reliable, Consistent Performance Makes Tap/R Screws Ideal For Automation Qualified Applications.
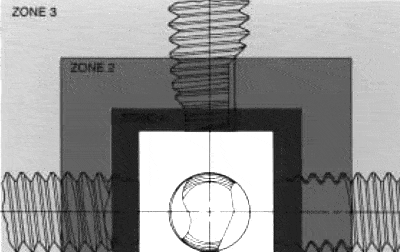
Zone 1 Features relief areas on two sides of the shank. Roll forming begins when the intermittent thread on the apex of the shank engages the work piece.
Zone 2 One side of the shank remains unthreaded, while partial threads are added to the opposite side. These initial threads have complete crests, which contribute to the gradual shaping of the mating thread.
Zone 3 Features a full thread form on a full 360° shank to provide total engagement in the work piece. This full engagement enables the fastener to retain a greater percentage of the tightening torque and consequently to hold more securely than other thread forming screws.
Minimum Length (Under Head) Dimensions In Inches
| SCREW SIZE |
4-40 | 6-32 | 8-32 | 10-24 | 10-32 | 12-24 | 1/4-20 | 5/16-18 | 3/8-16 |
|---|---|---|---|---|---|---|---|---|---|
| MINIMUM LENGTH |
3/8 | 3/8 | 3/8 | 3/8 | 3/8 | 3/8 | 7/16 | 7/16 | 5/8 |
TAP/R® screws are available in all conventional head styles and meet ANSI/ASME standards.

TAP/R screws are available with either a semi-gimlet or blunt point.

Recommended Pilot Hole Sizes Inch* Screws
| MATERIAL | INCH | .020-.055 | .061-.122 | .125-.245 | .250-.312 | .313-.500 | .375-.499 | .500-.625 |
|---|---|---|---|---|---|---|---|---|
| THICKNESS | APPROX. U.S. GAUGE | 26-17 | 16-11 | 11-3 | 3-5/16″ | 5/16″-1/2 | 3/8″-1/2″ | 1/2″-5/8″ |
| INCH NOMINAL | PILOT | PILOT | PILOT | PILOT | PILOT | PILOT | PILOT | |
| SCREW SIZE | MATERIAL | HOLE | HOLE | HOLE | HOLE | HOLE | HOLE | HOLE |
| DIA.-T.P.I. | DIAMETER | DIAMETER | DIAMETER | DIAMETER | DIAMETER | DIAMETER | DIAMETER | |
| 4-40 | STEEL ALUMINUM | .098 .098 |
.102 .100 |
.104 .102 |
||||
| 6-32 | STEEL ALUMINUM | .120 .120 |
.120 .120 |
.125 .125 |
.128 .125 |
|||
| 8-32 | STEEL ALUMINUM | .147 .147 |
.150 .150 |
.154 .152 |
||||
| 10-24 | STEEL ALUMINUM | .166 .166 |
.172 .166 |
.177 .170 |
||||
| 10-32 | STEEL ALUMINUM | .173 .173 |
.177 .173 |
.180 .177 |
||||
| 12-24 | STEEL ALUMINUM | .193 .191 |
.199 .196 |
.203 .199 |
.203 .203 |
|||
| 1/4-20 | STEEL ALUMINUM | .219 .219 |
.224 .221 |
.228 .224 |
.234 .228 |
|||
| 5/16-18 | STEEL | 0.281 | 0.285 | 0.285 | 0.29 | |||
| 3/8-16 | STEEL | 0.348 | 0.348 | 0.354 | 0.354 |
Note: Special materials and applications may warrant special hole sizes. Metric sizes also available.
Note: Standard finish is Zinc and Wax, other finishes are available – inquire with WCL.

