 Function Of The Helical Spring Lockwasher
Historically, helical spring lock washers have been among the most widely used anti-loosening assembly components on the market. They have been specified in thousands of assembly applications because they work—and work extremely well. They enhance the security of general industrial assemblies in the following ways:
- Apply greater bolt tension per unit of applied torque.
- Provide hardened bearing surfaces to create more uniform torque control.
- Provide more uniform load distribution through controlled radii (section) cutoff.
- Provide protection against looseness resulting from vibration and corrosion.
- Optimum locking device for use in applications with hardened faying or bearing surfaces.
The “Split” in the helical spring lock washer absorbs initial driving torque and visually closes under nominal bolt loading. When tension in the assembly is reduced and loosening occurs, it provides resistance to the back-off rotation of the screw.
Independent tests show that this is just a small part of the helical spring lockwasher’s contribution to assembly integrity.
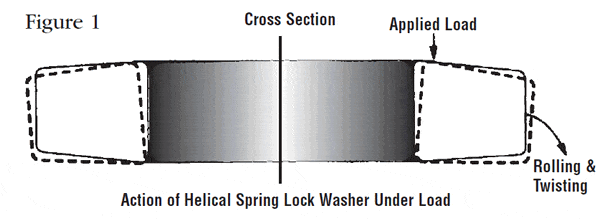
Helical washers are trapezoidal in section. After the single-coil spring closes to the flat condition, further loading results in additional deformation of the washer.
This further deformation is caused by a complex twisting of the trapezoidal section and a slight increase in the diameter of the washer under load. (See Figure 1.)
The spring rate which is developed by the final deformation is very high and provides a reactive load that is equivalent to a significant increase in effective bolt length.
Bolts stretch under load. The longer the effective length of the bolt, the more it can stretch. A hardened steel bolt, when stressed at 60,000 psi, will elongate approximately .002″ per inch of effective length. A long bolt can, therefore, be a very effective spring and, like a spring when stretched, it attempts to return to its original length. This applies a clamping or tightening force to the assembly.
The clamped components are compressed and, in their inherent effort to expand to their original form, they set up an opposing force. It is these two forces that create the dynamics of a tight assembly.
Spring Rate
Two terms are used to define and measure these described forces. One is Spring Rate. The other is equivalent bolt length.
Spring Rate is the ratio of load to deflection in the loaded part; it is deflection related to load and is expressed in terms of the amount of load required to achieve specific levels of deflection. The optimum joint performance is obtained when the spring elements in the fastening system have a spring rate which is low enough to assure that any yielding of the joint members in compression will not significantly reduce the designed tensile stress in the fastener. To obtain this optimal condition, the conventional solution is to utilize the spring characteristics of very long bolts. An auxiliary spring element, such as helical spring lock washer, is a very effective alternative.
Tests run by Lawrence Technological University have shown that the typical helical spring lock washer exhibits a spring rate after flattening which is approximately 70% more effective than a flat washer of the same thickness.
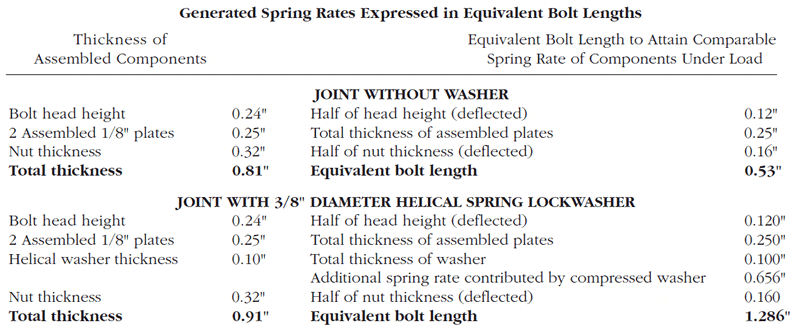
What this means to the design engineer is that the effective bolt length in the joint is increased by the thickness of the flattened helical spring lock washer, plus the equivalent length provided by the spring rate derived from the visually flattened washer. Tested at 75% of the hardened bolt proof load, the equivalent bolt length is as shown in figure 2.
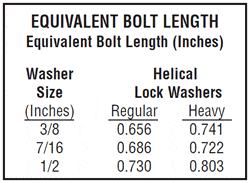
Figure 2
The total contribution of a helical spring lock washer to the integrity of an assembly, in addition to the commonly recognized frictional resistance to back-off rotation, includes the reactive length added to the bolt by the washer thickness and by the tension of Spring Rate generated by its compression.
The significant contribution of the helical spring lock washer to the overall tightness of an assembly is best shown in the test results for an assembly without a washer and an assembly that includes a helical spring washer.
General Information
Standards
WCL helical spring lock washers qualify under the major standards requirements established by ASME (the American Society of Mechanical Engineers) and DOD (Department of Defense) for components of this type.
Military Specifications
MS35338-, MS35340-, MS51416-, MS51415-, MS51848-, MS122029 thru MS122036, NAS1640, NAS1676 Also Ordnance series 12387272 – XX, 12387302 – XX
AMERICAN SOCIETY OF MECHANICAL ENGINEERS: ASME B 18.13, ASME B 18.21.1, ASME B 18.21.2M
MATERIALS
- Carbon Steel – SAE 1055 – 1065
- Boron Steel – 10B55 – 10B65
- Alloy Steel – SAE 4037
- Stainless Steel – SAE 304, SAE 316, SAE 420
- Aluminum Alloy – ASTM-B 211, 7075
- Phosphor Bronze – ASTM-B 159, Copper Alloy NO.510
- Silicon Bronze – ASTM-B 99, Copper Alloy NO.651 or 655
- Monel K500 – QQ – N – 286
Finishes
When carbon steel helical spring washers are required for galvanizing, this must be indicated on the order or inquiry. ASME standards call for such washers to be coiled to limits 0.020″ in excess of conventional standards. Galvanizing is not recommended for washers under a 1/4″ nominal size.
Helical washers are available in the following finishes:
- Mechanical Zinc
- Electro Zinc
- Mechanical Galvanized
- Hot Dip Galvanized,
- Phosphate Coating
- Black Oxide
Other materials and finishes are available on special request. Mechanical Finish will limit exposure to hydrogen embrittlement unless otherwise specified.
Hardness Testing
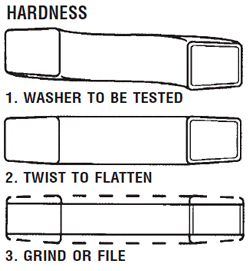
Figure 3
In preparing a helical spring washer for hardness testing, it should first be twisted to remove the helix and form a near flat surface.
Due to the trapezoidal cross section of the washer, both sides must be filed or ground flat to assure accurate readings. This also removes decarburization and plating from the surface. Care must be taken to assure that surface temperature does not exceed 250°F during this operation. (See figure 3.)
An essential requirement of the Rockwell test is that the penetrator be perpendicular to the surface of the test piece and that the test piece not move, in the slightest degree, as the test load is applied. One point of hardness represents a depth of only 0.00008″. A movement of only .001″ could cause an error of over 10 Rockwell numbers.
Penetration should be made in the center of the washer’s flattened surface and readings should not be taken too close together. If the indentation is made too close to the edge of the test washer, the material will yield, giving incorrect low readings. Also, the area surrounding the indent will be cold worked. Subsequent indentations, if made in the cold worked area, will give incorrect readings-usually higher that the virgin material. Also, test penetrations should be made on only one side of the washer.
The thickness of the test sample will determine the correct testing weight to use. Refer to Rockwell test charts to determine proper weight and scale use. To insure the most accurate readings, use the maximum weight possible. However, caution should be taken not to use a weight greater that the width and thickness will accommodate.
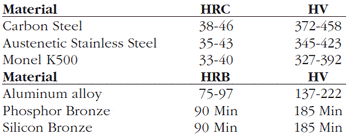
Applicable hardness requirements are:
Decarburization
Carbon steel spring washers, tested in accordance with ASME B 18.21.1, 1994 revision, should meet the following limits for decarburization:

All measurements in inches.

