FLAT WASHER AVAILABILITY – The flat washers listed in this catalog represent only a small portion of the many that are available. The WCL inventory contains over 7000 different sizes, in different materials, etc. All of these cannot be listed here because of space limitations. Source tooling is available for many others not shown. Pages 29 and 30 show some of the more commonly used specials that are available, cross-referenced to appropriate ordnance numbers.
QUALITY ASSURANCE – WCL has a Quality Assurance Department and Program to confirm the integrity of all the products it sells. We represent only those manufacturers that have an outstanding reputation for consistently providing high quality parts, and we maintain complete procurement data and certifications from our suppliers and processors on pertinent Stock Reference items.
SPECIFICATIONS, TESTING AND CERTIFICATIONS – A detailed explanation of the test requirements called for under the various military specifications and a listing of the many certifications available through WCL, appear on pages 8 and 9. WCL can be an indispensable source for parts conforming to all MIL-SPEC requirements. If parts are not tested to MIL-SPEC requirements, they are not MIL-SPEC parts. If parts are not plated to MIL-SPEC requirements, they are not MIL-SPEC parts.
NOMINAL DIMENSIONS – Nominal dimensions are provided on all flat washers and are so identified. They are provided for reference only. Parts are produced to standard commercial tolerance and are appropriate for all commercial applications. With regards to thickness dimensions indicated, parts conform to stamping industry standards. WCL frequently stocks popular washer sizes in more than one thickness and this is indicated in the charts. For specific tolerances and thicknesses on other referenced parts, please contact WCL. Parts with special tolerances and thicknesses can be provided as specified.
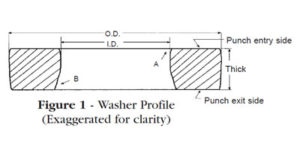
 INSIDE DIAMETER PROFILE – The inside diameter of a conventional flat washer traditionally has three distinct profiles as a result of the punch press process. As the punch enters, there is some pushing in of the material which results in a rounded corner section (A). Then, as the punch advances, it creates a substantially parallel section until it approaches the exit point and a tapered breakout occurs (B). Dimensions given for inside diameters, and their accepted tolerances, apply to the parallel sections. At the break out side of the washer, the specified maximum inside diameter may be exceeded by a maximum of 25% of the specified thickness. (See figure 1.)
